
Setting up your business information is a crucial step and must be completed before using the main administrative features of dotBizX.com. Follow the steps below:
1. Login into dotBizX.com
First, you need to Login to dotBizX.com. You can follow the instructions in SECTION 1.3 of the following article: Member account management operations in dotBizX.Com.
2. Go to Business Settings area
After you login into dotBizX.com finish, you click on BUSINESS SETTINGS (1) menu like Illustration 01 bellows.
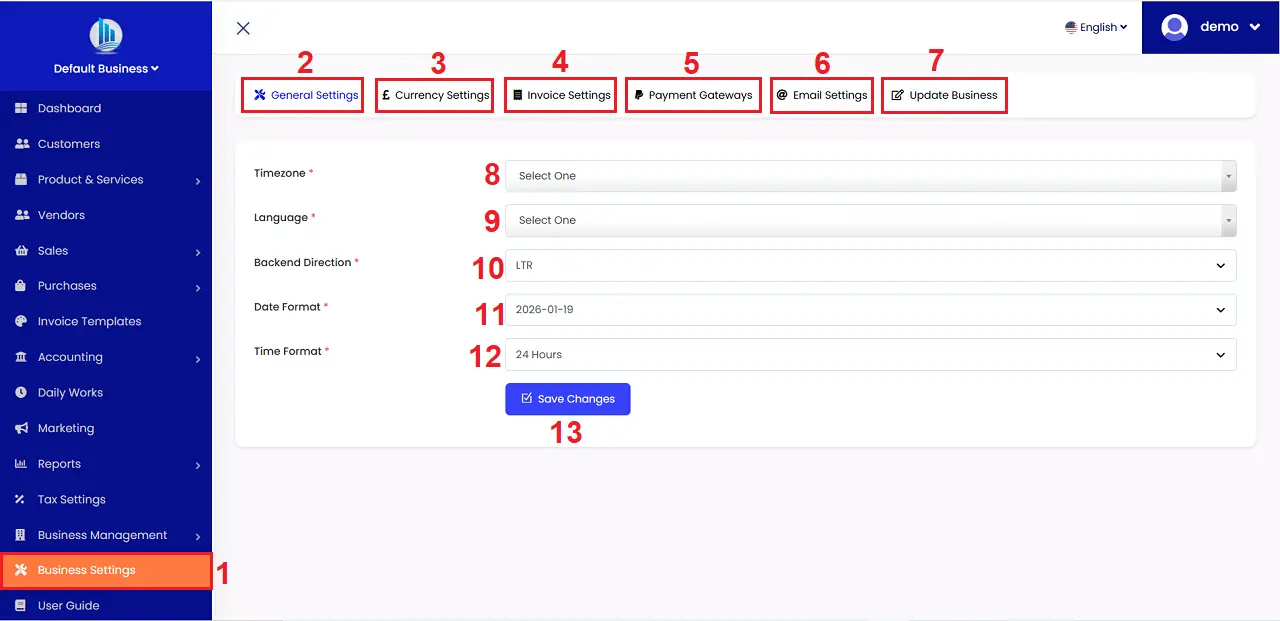
Illustration 01: Business Settings Interface
3. Processing for business settings
3.1. Generate Settings
In the window like Illustration 01 above, you click on GENERATE SETTINGS (2) tab => then you input all your informations from this form => Final, you click on SAVE CHANGES (13) button to save all changes to database.
* Notes:
+ Timezone (8) box: You should choose the timezone that's suitable with your country.
+ Language (9): You choose the language that you want to do. After that the interface of dotBizX.Com change to that language.
3.2. Currency Settings
To do it, you click on CURRENCY SETTINGS (3) tab => So you can see the CURRENCY SETTINGS like Illustration 02 bellows.
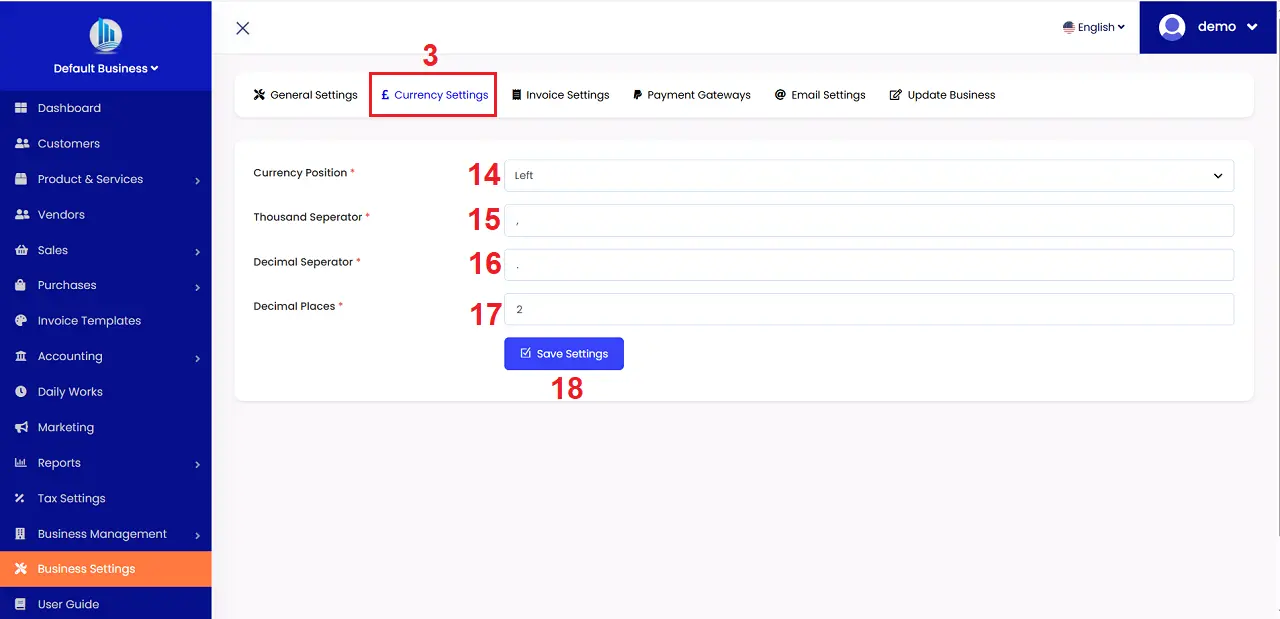
Illustration 02: Currency Settings Interface
In this form, you input the suitable data with all boxs => Final, you click on SAVE SETTINGS (18) button to save its changes to database.
3.3. Invoice Settings
To customize the information displayed on invoices, quotations, and purchase orders to suit your business style, click on the Invoice Settings tab. Then, enter the appropriate information into the data fields in the form that appears. Finally, click the SAVE SETTINGS button to complete the process.
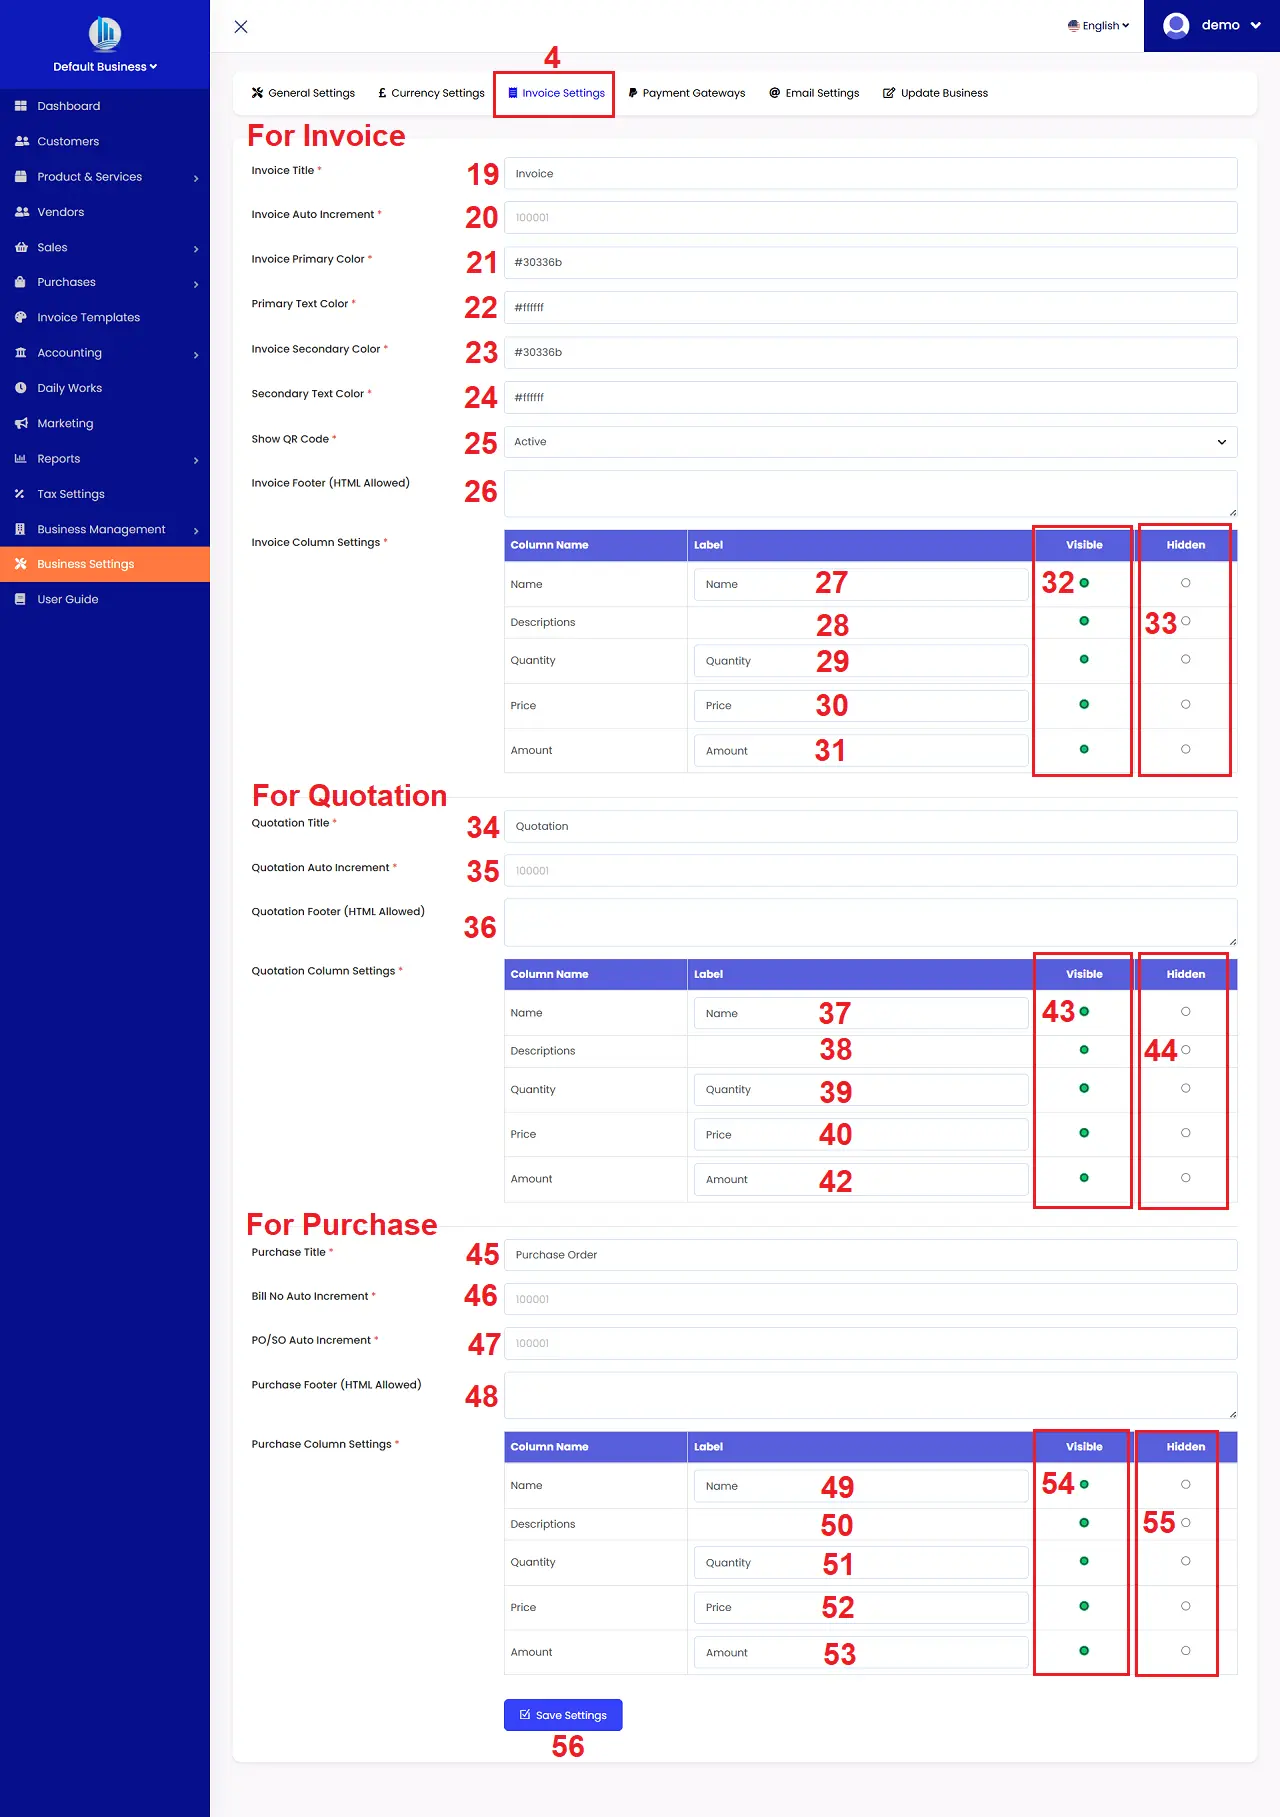
Illustration 03: Invoice Settings Interface
* Notes:
+ Invoice Auto Increment (20) box: It is the starting number for the Invoice Number, which the system automatically increments thereafter.
- You can set it is: 100001.
- When you create a new invoice then with first invoice's having invoice numbe that is 10001. Second invoice number is 100002....
+ Show QR Code (25) box: If this box is active so the QR Code of invoice that's showed in Your invoice, then, your customers can scan it and And they can pay directly from that invoice.
+ Invoice Footer (HTML Allowed) (26) box: Data in this element's showed in your invoice footer. It supports HTML formular.
+ 27th - 31th box: You can input Label for invoice in your language. It's showed in your invoice with your language.
+ Visible (32) column: When you tick for element of invoice so it's showed in your invoice.
+ Hidden (33) column: When you tick for element of invoice so it's not showed in your invoice.
+ Quotation Auto Increment (35) box: It is the starting number for the Quotation Number, which the system automatically increments thereafter. It has to be a number.
- You can set it is: 100001.
- When you create a new quote then with first quote's having quote numbe that is 10001. Second quote number is 100002....
+ Bill No Auto Increment (46) box: It's same Quotation Auto Increment (35) box.
+ PO/SO Auto Increment (47) box: It's same Quotation Auto Increment (35) box.
- PO => Purchase Order Number: Created by the buyer, used to place orders with suppliers. It appears on: Purchase orders, contracts, and invoices.
- SO => Sale Order Number: Created by the seller, it's used to record sales orders for customers. It's usually generated after receiving the purchase order (PO) or when the customer places an order.
3.4. Payment Settings
To enable automatic payment for your customers' purchases, you need to set up online payment gateways such as PayPal, Stripe, etc.
To do this, click on the PAYMENT SETTINGS (5) tab => Next, click on the appropriate online payment gateway => Then, fill in the appropriate information => Finally, click the SAVE SETTINGS (63) button to complete the setup.
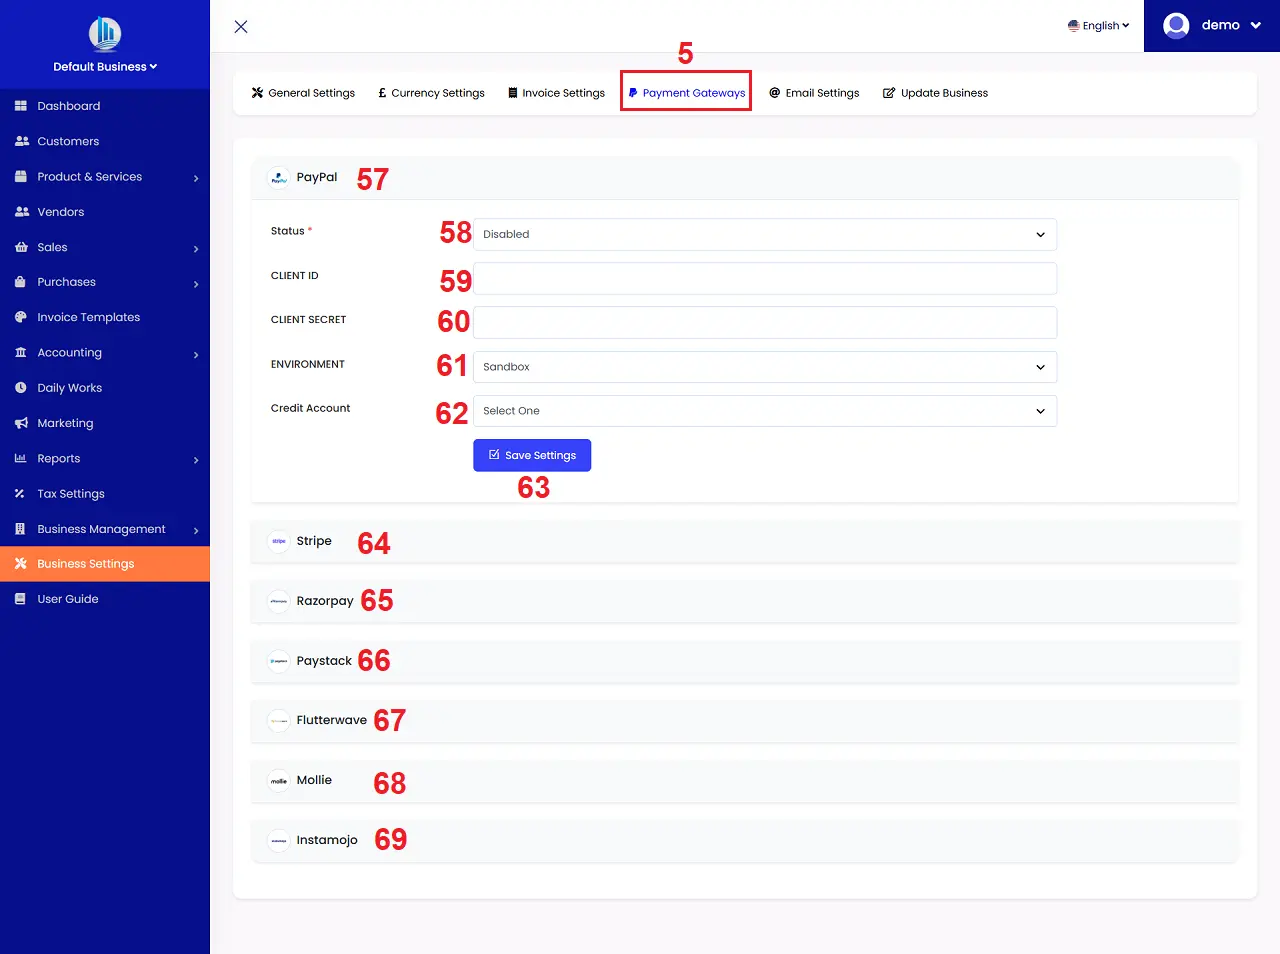
Illustration 04: Payment Settings Interface
* Notes:
If you want to setup for paypal method so you click on Paypal (57) box, then you input the suitable information for all boxs in the paypal form like Illustration 04 above.
+ Status (58) box: You choose the Active value. So The paypal method's showed when your customers process to pay for their invoices.
+ ENVIRONMENT (68) box:
- Sandbox value: It's used for test.
- Live value: It's used for the real payment.
+ CLIENT ID (59) AND CLIENT SECRET (60) box: You can follow the userguide of paypal to get it. After that, you input them here.
+ Credit Account (62) box: You choose the appropriate accounting account so that after a customer makes a payment, the amount will be recorded in that account. You will create this accounting account in the ACCOUNTING Menu.
3.5. Email Settings
Configure the mail server information to send emails to customers, suppliers, and employees within the company. To set up the server information, click on the EMAIL SETTINGS (6) tab => In the new window that appears, enter the necessary information => Finally, click the SAVE SETTINGS (78) button to complete.
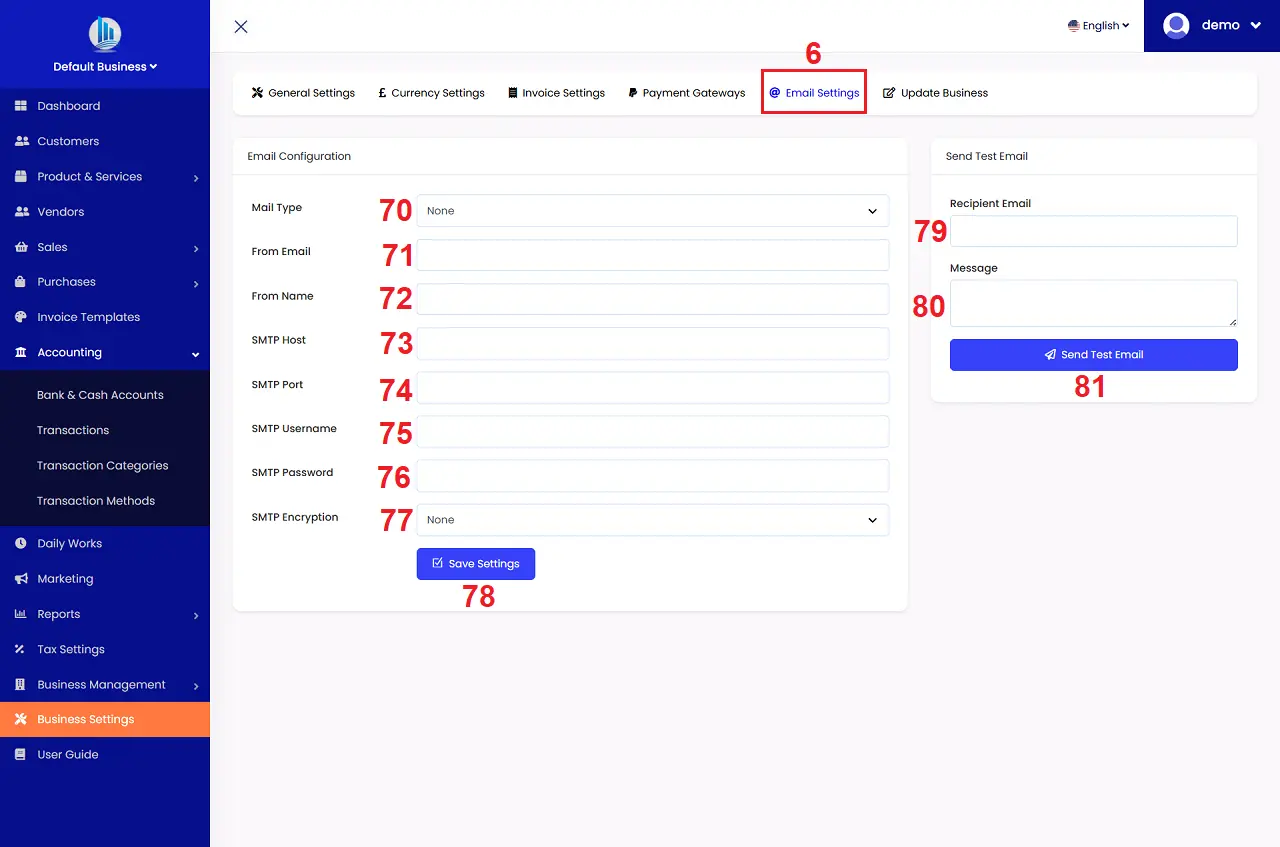
Illustration 05: Email Settings Interface
For example, if you want to use Gmail as your mail server, you would set it up as follows:
+ Mail Type (70) box: You choose the SMTP value.
+ From Email (71) box: You Input your email address that you want to use it to send mail. For example: dotbizx@gmail.com.
+ From Name (72) box: You input your brand name that you want to show it in From Name Field of your customer's inbox. For example: dotBizX.
+ SMTP Host (73) box: You input the value that's smtp.gmail.com.
+ SMTP Port (74) box: You can input the value that is 465 or 587.
+ SMTP Username (75) box: You input the username of your email address here. For example: dotbizx or dotbizx@gmail.com.
+ SMTP Password (76) box: Enter your Gmail account's app password here.
+ SMTP Encryption (77) box: You choose SSL value if the smtp port is 465. You choose TLS value if the smtp port is 587.
=> Final, you click on SAVE SETTINGS (78) to finish.
* Notes:
+ Send Test Email area: It's used to test whether the mail server settings you've configured are correct. If correct, the system will return a green notification; otherwise, it will return a red failure notification. If the notification is red, you need to recheck your server settings and try testing again. Once the server is correctly configured, you can use dotBizX.com to send emails to your customers.
+ Recipient Email (79) box: You input the Recipient Email that you want to test here.
+ Message (80) box: You need input the content of your message here.
=> Final, you click on SEND TEST EMAIL (81) button to test.
3.6. Update Business
To update current business information, click on the UPDATE BUSINESS (7) tab like Illustration 01 above.
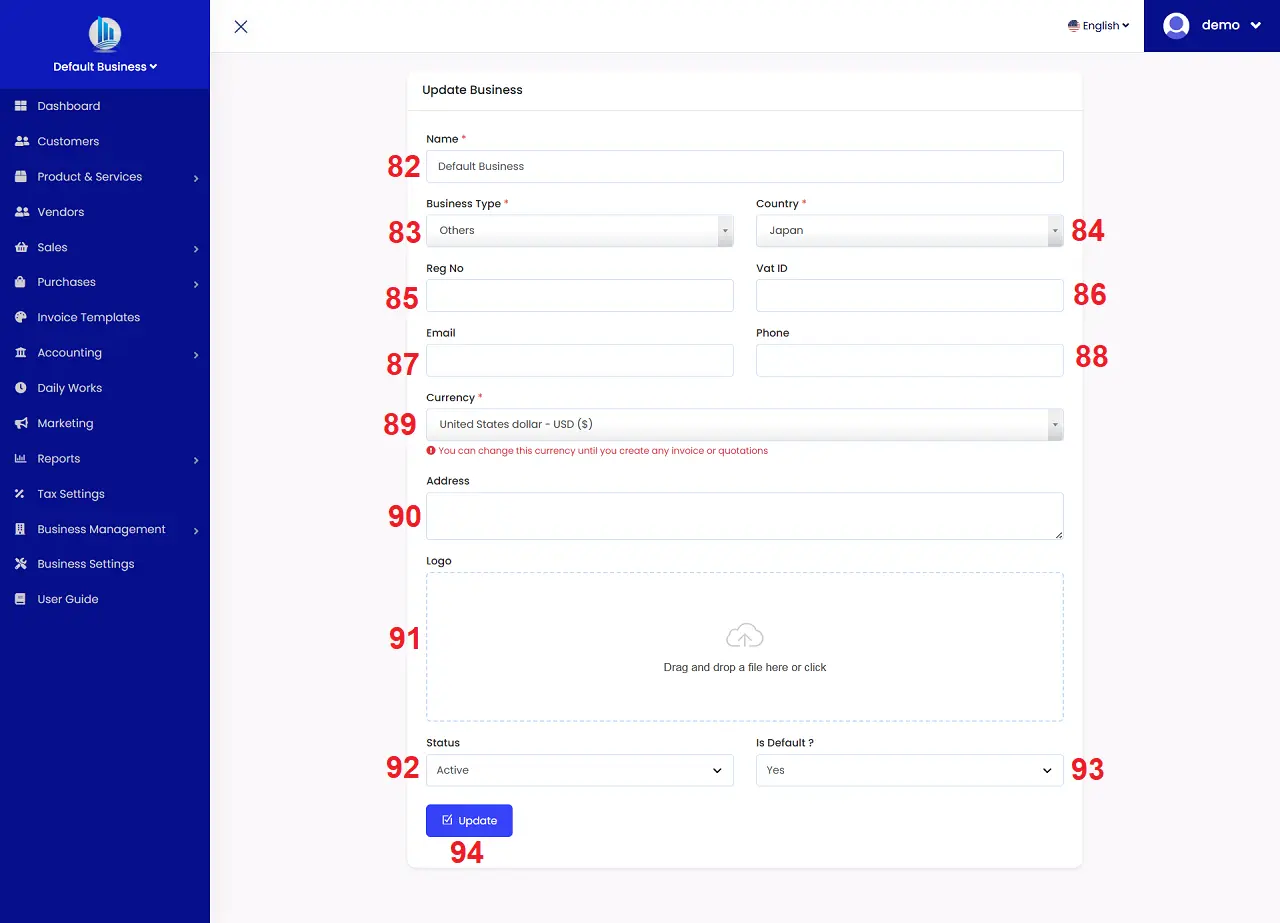
Illustration 06: Update Business Interface
In the update business window like Illustration 06 above, you need input your business information for all boxs in that form => Final, you click on UPDATE (94) button to finish.
* Notes:
+ Reg No (85) box: You need input your Business Registration Number/Tax Registration Number here.
+ Vat ID (86) box: You need input your Value Added Tax Identification Number here.
+ Logo (91): It support the image with max size is 300kb.
+ Status (92) box: Active - Your business is active and you can do any things. Disible - It's hiddened so you can't do any things with this business.
+ Is Default ? (93) box: It's Yes so this business is default for your to process all functions of it.