
Business Management in dotBizX.Com plays a vital role in helping organizations structure, control, and scale their operations efficiently. With dotBizX.Com, you can easily create new business units, edit existing business information, delete outdated units, and invite members to collaborate within each business. Whether members are employees, customers, suppliers, or partners, this guide will walk you through how to manage business units effectively, ensuring clear roles, smooth collaboration, and streamlined business operations on the dotBizX.Com platform.
ARTICLE CONTENTS
DETAILED CONTENT
To manage a basic business or business unit, you need to follow these steps:
1. How to show list of business?
To show list of business, you click on BUSINESS MANAGEMENT (1) menu => next, you click on BUSINESS MANAGEMENT (2) option like Illustration 01 bellows.
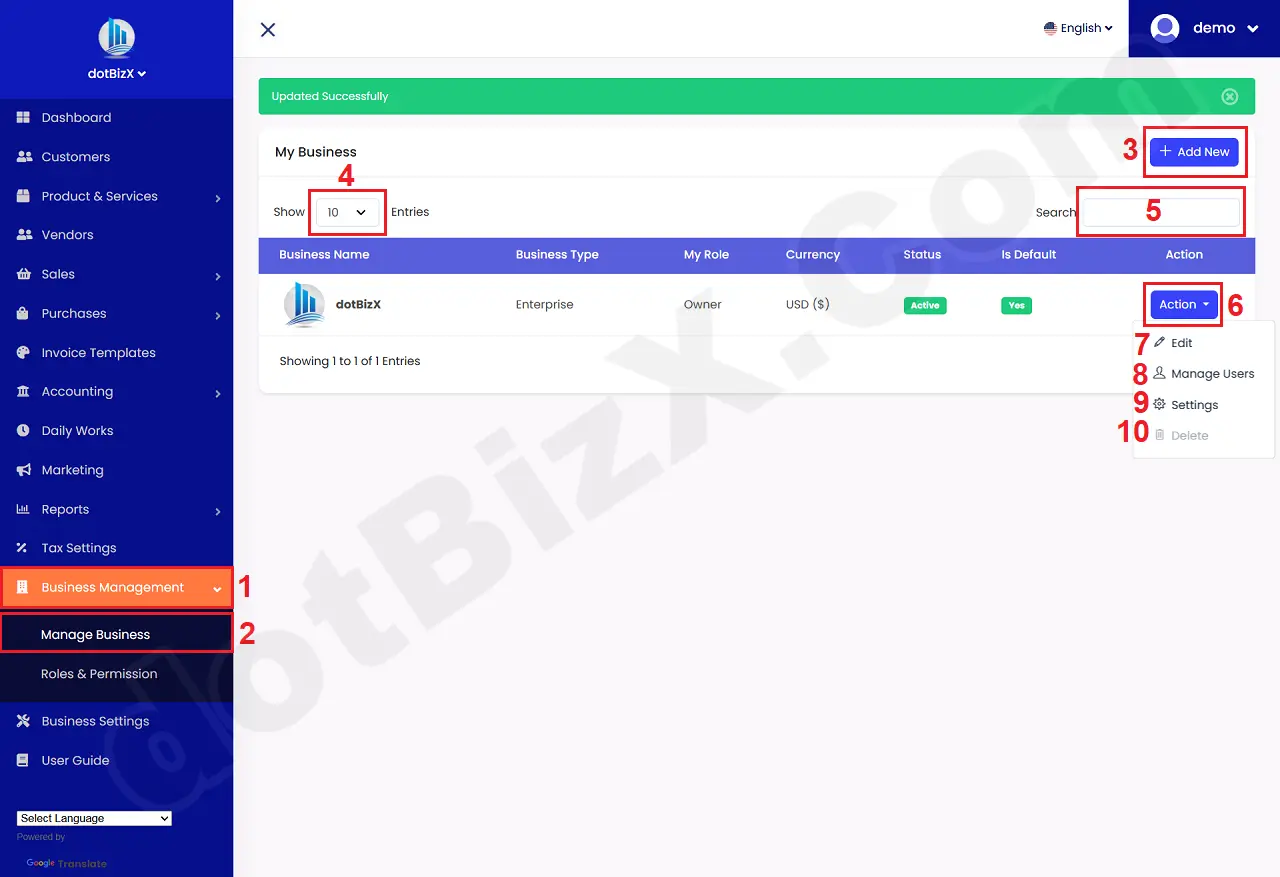
Illustration 01: List of Business
* Notes:
+ Add New (3) button: Click on this button to create new business. If you have more business, so you can choose the suitable business to work in business's logo in top left side of this window.
+ 4th box: You can choose the number of business that's showed in the table bellows.
+ 5th box: You can use it to find the business via keywords that you input there.
+ Action (6) button: You click on this button to show drop menu that's suitable with the business at its row.
+ Edit (7) option: It's used to modify the information of business.
+ Manage Users (8) option: It's used to invite your staffs, customers, vendors to the business. It's also used to remove users out to that business.
+ Settings (9) option: It's used to change settings of the business. It's same the guide of article: Install and Update Business Information.
+ Delete (10) option: It's used to delete the suitable business.
2. How to Edit an existing business?
In list of business like Illustration 01 above, you click on Action (6) button that's suitable with the business which you want to edit => then you click on Edit (7) option => after that, you can see the window like Illustration 02 bellows.

Illustration 02: Edit an existing business
After you modify that business, you click on UPDATE (24) button to finish.
* Notes:
+ Logo (21): The maximum logo size is 300kb.
+ Status (22): Active - This business is show and you can do any things with it. Disable - It's hiddened then you can see it.
+ Is Default ? (23): YES - This business unit is the default business unit you will work with. Every time you log in to dotBizX.com, you will default to working with this business unit.
3. How to manage users of the business?
3.1. Show List of Users
In list of business like Illustration 01 above, you click on Action (6) button that's suitable with the business which you want to Manage Users => then you click on Manage Users (8) option => after that, you can see the window like Illustration 03 bellows.
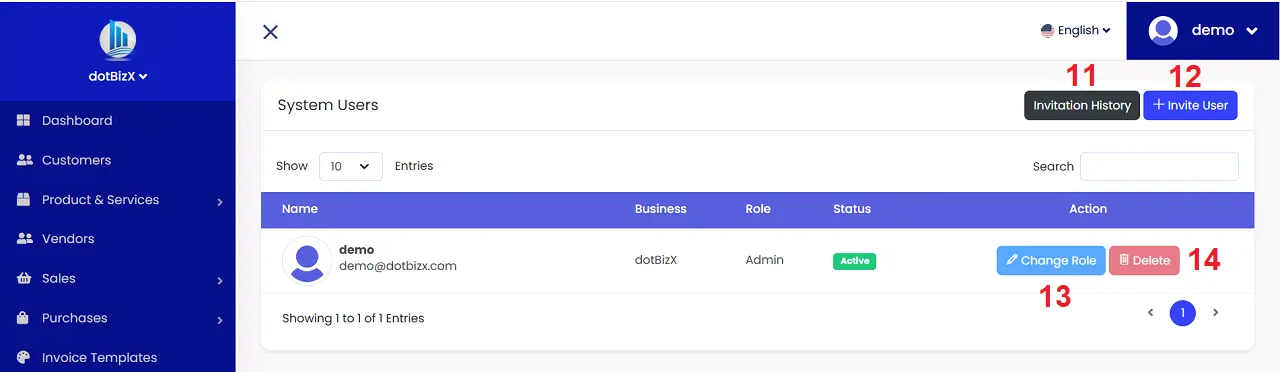
Illustration 03: List of Users in the Business
* Notes:
+ Invitation History (11) button: When you click this button, it will display a history list of users you have invited to this business unit.
+ Invite User (12): When you want to invite Users join this business so you need use this function.
+ Change Role (13) button: It is used to assign permissions to use the functions of dotBizX.com to users in accordance with their responsibilities and authority.
You can create a Role for User with this article: Roles and Access Rights in dotBizX.Com.
+ Delete (14) button: It's used to delete that User.
3.2. Invite User to the Business
To invite user into the business, you click on INVITE USER (12) button then you can see the new window like Illustration 04 bellows.
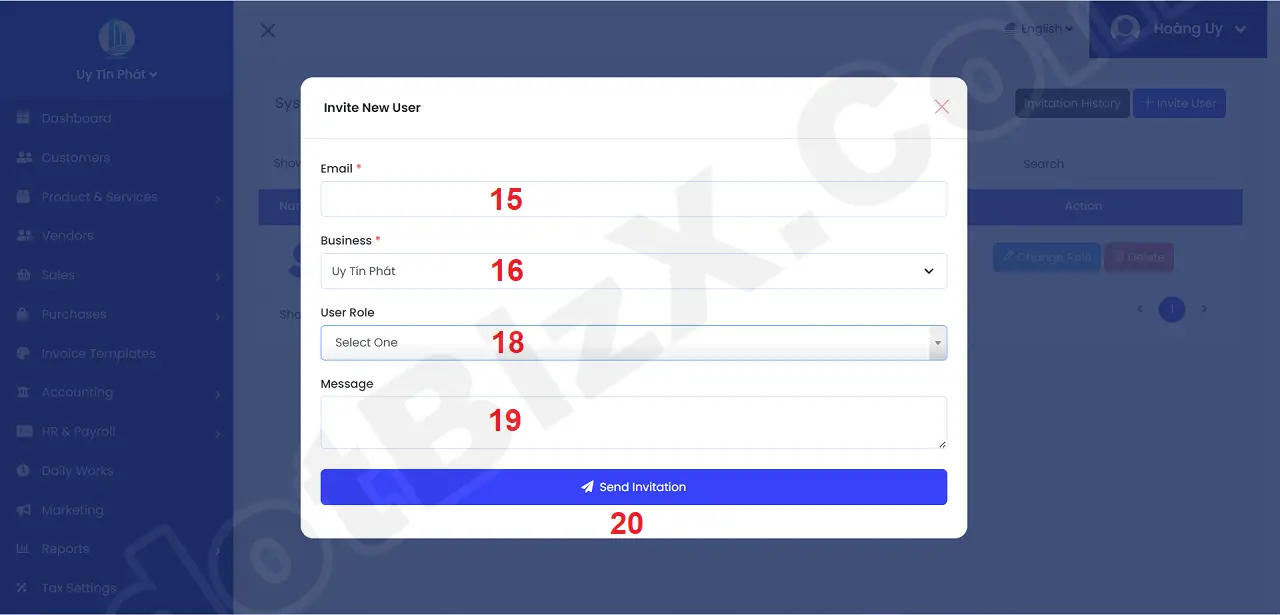
Illustration 04: Invite user to the business
Now you input the information for above form => Final, you click on Send Invitation (20) button to send email to that user.
When user click on Invitation Link in his mail so he can join that business and he can use all functions of dotBizX.Com with his role.
* Notes:
+ Email (15) box: You input email of user that you want to invite him to your business.
+ Business (16) box: You choose the business that you want to invite user to that business.
+ User Role (17) box: You choose the role for that user.
+ Message (18) box: You input the content to send for user.
=> To send emails to users, you need to ensure that you have successfully set up the mail server information for that business. For details, please refer to SECTION 3.5. EMAIL SETTINGS of this article: Install and Update Business Information.
+ What does your user have to do to login into dotBizX.Com?
- Step 1: After you send "Invitation" for him, let tell him to check his email in inbox (or spam) folder to find your email with subjec that is "Invitation to collaborate" => then click on "Accept Invitation" button in his email box => after that one window's open with name "Verify Your Email Address".
- Step 2: In "Verify Your Email Address" window, he has to click on "Click here to request another" button => one email's sending to his mail box.
- Step 3: He need check mail and click on "Verify Email Address" button => after that he's going to Dashboard of dotBizX.Com without login.
- Step 4: He has to change his password. Let's do it like 4th section of article: Member Account Management Operation in dotBizX.Com.
=> Now he can login into dotBizX.Com with his email and his password.
3.3. How to asign the role for user?
To asign the role for user, you click on CHANGE ROLE (13) button [like Illustration 03 above] => Then you asign the suitable role for that user.
* Note:
+ You cann't change role of user who has role is admin.
+ You can create a Role for User with this article: Roles and Access Rights in dotBizX.Com.
3.4. How to delete an user?
To delete an user, you click on DELETE (14) button [like Illustration 03 above].
* Note: You cann't delete user who has role is admin.
4. How to delete a business?
To delete a business, you click on DELETE (10) button [like Illustration 01 above].
5. How to change settings of business?
To change settings of a business, you click on SETTINGS (9) button [like Illustration 01 above] => Immediately afterwards, follow the instructions in the following article: Install and Update Business Information.
In conclusion, Business Management in dotBizX.Com provides a flexible and efficient way to organize and control your business structure. By allowing you to add new business units, update or remove existing ones, and invite members such as employees, customers, suppliers, and partners, dotBizX.Com helps streamline collaboration and operational management. When used effectively, these features support better coordination, improved transparency, and scalable growth for businesses of all sizes.